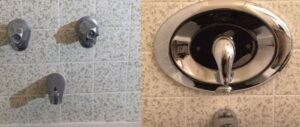
There are different numbers of handle shower faucets I found in the bathroom, such as one, two, and three. But, is it possible to replace a 3-handle shower faucet in your single hand? Is it complicated to do?
 Or
Or
How to replace a 3-handle shower faucet with a single handle? It is hard enough to provide you with an exact answer because you need to complete a simple method to replace a 3-handle shower faucet with a single hand. So, let’s get started.
How to Replace a 3 Handle Shower Faucet with a Single Handle? [Need to Complete 11 Steps]
To replace a 3-handle shower faucet, you need to focus on some previous points which help you to hassle-free replace the 3-handle shower faucet with your single hand. So, check out the following points and then jump to the main steps to replace.
- Check out that the shower faucet is properly working. If the shower faucet is not working properly, you need to purchase a new shower faucet to work properly.
- Make sure that you have some tools. For example, shower faucet fixtures, screwdrivers, waterproof tape, etc.
- You should check out each of the faucets so that you can clearly understand the proper and follow the below steps.
Step 1: Shut Off the Water
First and foremost, you need to shut off the water line from your water tank. It is easy to do because the tank pipe key helps you to shut off the water properly.
Step 2: Put Out a Drop Cloth
To protect the tub and prevent the small parts from the shower handle, you should use a piece of cloth. Moreover, the clothes also protect against falling down the water drain.
Step 3: Remove the Handle
Now, you have a screwdriver. Am I right? Well, you should remove the shower faucet handle using the screwdriver. You will find out the handle under the cold and hot covers.
Step 4: What About Escutcheons?
If you are completed the above three steps, you need to remove escutcheons from the shower faucet/valve. You don’t need to use extra tools to remove escutcheons because you can easily remove them with your hands.
Step 5: Valve/Faucet Bodies
In this step, you need to remove valve bodies from the shower or bathroom wall. Or you can also find the valve body from slip joint pliers, which usually come with a tub socket.
Step 6: Replace Valve
Well, it is time to replace the 3-handle shower faucet one by one. First of all, you need to replace the seat valve. You will discover a repair kit for the shower faucet, or you need to buy the shower faucet kit separately.
Step 7: Put a New Valve
Most of the time, the old valve death; that’s why you should put a new valve stems and tight the stems in the tub socket or the shower faucets without facing a single problem. Check out the video to install the shower valve.
Step 8: Tighten the Bonnets
Finally, you should tighten the bonnets on each of the stems, which helps the shower handle open-ended. You can use a wrench to complete this step.
Step 9: Screw the Trim & Using Kit
Using a screwdriver, you can screw the trim from the replacement kit over the shower faucet stem. After that, you should screw escutcheons over the trim. You must need to screw the trim and kit properly; otherwise, you may not complete the whole process.
Step 10: Add Handle
If you are completed the above 9 steps properly, you should add the handle again. Add the handle with the screwdriver and tighten it properly. Note that you should assemble the cold and hot sections of the handle properly to avoid risk.
Step 11: Recheck
After completing the above 10 steps, you should recheck all the steps to clear your confusion and finish the method properly. If you have any questions about this matter, let me know in the following comment box.
How to Replace a Two Handle Bathtub Faucet with a Single Handle?

Are you facing trobling to replace a two-handle bathtub faucet with a single handle? Then you can check out the following points to complete the job. Note that it is similar to replacing a two-handle bathtub with a three-handle bathtub.
- Shut off the waterline from the water tank so that you can hassle-free complete your task.
- Drop a cloth; you can use an old or useless cloth to protect the tub from the bad effects of the waste
- Remove the handle and clean it properly
- Now, it is time to use the valve kit (you can use a new one when the valve kit deaths
- Use trim and streams on the valve and tighten it properly so that the valve is assembled with the bathtub
- Add the handle after completing all of the steps and connect the waterline to use the handle of the bathtub. I hope that it is working for you.
3 Handle VS 1 Handle Shower Faucet
There are lots of differences I found between 1 handle and 3 handles in the bathrooms. However, you can check out the following table to get a perfect comparison between 3 handles VS 1 handle shower faucet.
[ninja_tables id=”211″]
FAQs (Frequently Ask Questions)
Q: How do I convert a double shower faucet to a single?
Answer: You can use a double shower faucet converter for a single shower handle. Or, you can also hire a plumber who helps you hassle-free convert a double shower handle to a single shower handle.
Q: Can I replace a double handle faucet with a single handle?
Answer: Of course, you can replace a double handle faucet with a single handle using the faucet converter. It is a little bit tricky method to replace a double handle faucet with a single handle. That’s why I would love to suggest you hire a plumber to fix the problem.
Q: Can you replace the shower handle without replacing the valve?
Answer: Yes, you can replace the shower handle without replacing the valve using a universal replacement kit. Most shower faucet brands accept universal replacement kits so that users will get the best benefits.
Is It Clear to You?
I think the above article helps you to understand and replace a 3-handle shower faucet with a single handle. Note, I followed the above 11-steps to replace my bathroom. It is easy for me, and I strongly believe that you will easily and comfortably replace it without facing a single error.
Related Post:

Hi, there my name is William Lee and I am the founder of the DecorHomefFiner.com website. I am an expert DIY for bathrooms, living rooms, and kitchens. I am also a social helper which means I am helping people on social media about their homes.